Saturday, November 16, 2019

Another New Card-Making Adventure!


My school started a new section of classes for Junior High students called 'Electives' this year.  They happen once a week in an added 9th period on Fridays.  There are a variety of courses including everything from cooking to film history.  I get the opportunity to lead a card making class!  For our first card, I wanted to keep stamping to a bare minimum so I focused more on card layering.  I started with a piece of mint cardstock from Hobby Lobby as the card base.  Next I use different design papers to create layers on the card with a fall pumpkin theme.  I used another shade of cardstock for the mats for the design paper.


I tried to keep the sentiment easy for them by choosing a set of Thank You stickers and putting them on a circle punched from the same mint cardstock as the base.  For some extra design I found an awesome ribbon with butons sewn on that we adhered to the front with glue dots.


For the interior we stamped a sentiment on a piece of the dark green we used as mats on the front.  I chose to add a piece of cardstock to the interior instead of stamping directly on the card base in case they made a mistake and had to flip the paper over.  😁😁  The girls did a great job and I was so excited to finish one in the short time we had that first day.  

Supplies:
Cardstock:   Paper Studio - Mint, Dark Mint
Design Paper: Hobby Lobby - Pumpkins, Plaid, Orange Foil Pumpkins, Dark Mint Pattern
Stamps: Stampin' Up
Dies and Punches: Circle Punch 2 1/4"
Ink: Memento - Tuxedo Black
Embellishments: Button Ribbon, Paper Studio - Thank You Stickers


Tuesday, November 12, 2019

Warmest Wishes Card #6


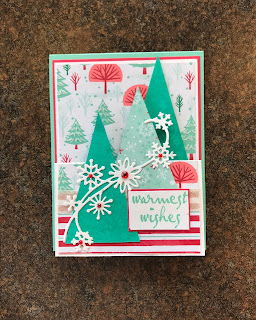
Today we finally have Card #6 for our ladies' event at church.  This one is probably my favorite.  This was the first time I had ever tried a double easel card.  I CASE'd the layout from Di Barnes.  I loved her design with the trees and and snowflakes.  I began with a Mint Macaroon card base for the largest easel.  Next I cut a piece to use as a mat from my Recollections Shades of Red pack.  To create the second easel I cut and scored a piece of white cardstock by Recollections (my usual 110 lb!).  Next I opened up the amazing new design paper from Stampin' Up - Let It Snow.  I cut mats to fit the front of both easels from the DSP then added some glitter washi tape by the seam.  For the Christmas trees I chose a tree image using Cricut Design Space and adjusted it to the height and width I wanted.  The trees were cut from Stampin' Up's Coastal Cabana.  Two of the trees were stamped with a tree image in VersaMark Frost to create some texture.  One was covered with another sheet of DSP from the let it Snow set.  Using Stampin' Up's snowflake dies I made the snowflake swirl and added some gems from Recollections to make them stand out a  little more.  Finally I used a stamp from the All Year Cheer I set from Stampin' Up as my sentiment.


Sorry for the next picture, for some reason the lighting is off, but it's actually the same card and paper as above.  The inside uses a snowman stamp from Holiday Silhouettes stamped in Coastal Cabana and another sentiment from the Stampin' Up set in Memento.


That finishes off my 6th and final card for our event.  Just love the multi-dimensional look when it's standing!


Supplies:
Cardstock:   Recollections - Shades of Red, White; Stampin' Up - Mint Macaroon, Coastal Cabana
Design Paper: Stampin' Up - Let It Snow
Stamps: Stampin' Up - All Year Cheer I, Inkadinkado - Holiday Silhouettes
Dies and Punches: Stampin' Up - Snowflakes
Ink: Stampin' Up - Coastal Cabana, Memento - Tuxedo Black, VersaMark - Frost
Embellishments: Glitter Washi, Recollections - Red Gems
Cricut Design Space

Saturday, November 9, 2019

Free as a Bird Christmas Card - #5

This card uses the amazing stamp set from Stampin' Up called Free as a Bird.  I love birds in general and this set is just amazing.  There are times that I don't know how they can eat so much bird feed in a short time, but I'm going to hope the quick turnaround is because we have so many birds, not just overeating birds.  😀

But back to the card!  I started with some wonderful metallic cardstock I got at a craft event in Ft. Wayne.  I made a mat for the front using Recollections Shades of Red cardstock behind a piece of design paper from Michaels.  Next I used a series of circle punches to create the front design using the Free as a Bird set and stamping it in Memento.  I used a piece of red ribbon between the circles and finished with a sentiment from Stampin' Up on white cardstock, matted again in Shades of Red.


For the interior I put a piece of the ribbon around a piece of white cardstock to create an interior mat.  The bird is fussy cut from the portion left over from the decorative stamp on the front.  Finally, I used my Stampin' Blends to color the birds to match the design paper.


Supplies:
Cardstock:   Recollections - Shades of Red, White; Rusted Curious Metallic Green
Stamps: Stampin' Up - Free as a Bird, Petite Pairs
Dies and Punches: Circle Punch 3", 2 3/4", 2 1/4"
Ink: Memento - Tuxedo Black; Stampin' Blends - Dark/Light Calypso Coral;
Dark/Light Poppy Parade, Dark Crumb Cake
Embellishments: Celebrate It - Red Ribbon

Wednesday, November 6, 2019

Holly Jolly Christmas - Ladies' Card #4


For today's card I finally got to use some of my wonderful handmade paper.  I just love the texture on it!  I started once again with cardstock from Recollections' Shades of Red pack for the card base.  For the front I cut a piece of Certainly Celery as a mat and pieces of the handmade paper and the design paper to make a front for the card.  I covered the seam of the two papers with a piece of Willow Green organza.  For the sentiment I used a stamp from the Christmas Traditions Punch Box, stamped in Certainly Celery.  The candy cane-like twine is from Ms. Sparkle and Co.  The whole sentiment is set off with pop dots to help draw your eyes in.


For the interior I broke out one of my favorite holiday stamp sets.  I stamped the elf, wagon and presents in Memento ink on a piece of white cardstock.  Next I took several of my Stampin' Write and Creative Memories markers to color in the adorable images from the Signs of Santa set.


Voila!  That finishes card #4!


Supplies:
Cardstock:   Park Lane - White, Recollections - Shades of Red, Stampin' Up - Certainly Celery
Design Paper: Handmade Red Texture Paper, k*i Christmas Tin Set
Stamps: Stampin' Up - Christmas Traditions Punch Box, Signs of Santa
Dies and Punches: Stampin' Up- Traditional Label Punch
Ink: Memento - Tuxedo Black; Stampin' Up - Certainly Celery; Stampin' Write - Only Orange, Crumb Cake
Green Galore, Yoyo Yellow, Gable Green, Pumpkin Pie, Tempting Turquoise, Orchid Opulence;
Creative Memories Markers - Brown, Blue
Embellishments: Ms. Sparkle & Co. - Red Twisted Twine, Stampin' Up - Willow Green Ribbon

Sunday, November 3, 2019

Merry Christmas Sizzix Die Card - Ladies' Night Card #3

What a crazy busy week!  It seems like things have been so full these last few weeks.  Thankfully, I've been able to enjoy a few card events in the midst of it all.  Today's card is another one I created for our ladies card day in November.  I began with a card die that I purchased at a craft show in Ft. Wayne.  They had some amazing products and since we don't have any scrapbooking or card shops in our area it was so nice to be able to see some new things.


I purchased this die with the card event in mind.  I started by using the Sizzix die to cut out the card base in white cardstock (110 lb, of course!)  With the type of die I was using, I might switch to a lighter weight cardstock when I make this with the ladies.  Next, I took a piece of red from the Recollections Shades of Red cardstock pack to create a mat for the interior that will show through around the front sentiment.  For the Outside sentiment and decorative interior mat I used some paper I purchased at Hobby Lobby.  After I attached them I cut a piece of white cardstock to make a mat for signing and decorated it with a Stapabilities row of stockings stamp in Memento - Tuxedo Black.  Finally, I used a piece of thin, Evergreen ribbon, wrapped it around and finished it with a bow.


Supplies:
Cardstock:   Park Lane - White, Recollections - Shades of Red
Design Paper: Hobby Lobby - Christmas Dotted Stripe, Christmas Polka Dots
Stamps: Stampabilities - Stocking Border
Dies and Punches: Sizzix - Merry Christmas Framelits Drop-ins
Ink: Memento - Tuxedo Black
Embellishments: Offray - Evergreen Ribbon


Thursday, October 31, 2019

Ladies' Card Night - Card #2

Card Number 2 uses a dies set that I think is just beautiful.  It is the Snowfall set from Stampin' Up.  I started with a white card base and then used a sheet of blue cardstock and embossed it with Park Lane's Snowflake folder.  Next, I die cut the large, medium and small snowflakes with the die set and  adhered them together with glue dots and topped with a small gem from Recollections.  I attached them to the embossed mat.  The mat was created using the snowflake embossing folder from Park lane.  For the sentiment I used my Stampin' Up set Heard from the Heart and stamped it with Brilliance ink and matted with the same blue cardstock.  I added some bling with the silver twisted twine and silver and white pearls.


The inside is a new stamp that I purchased during a craft show in Ft. Wayne.  It's stamped in the same ink from Brilliance and the sheet is attached to the card base to add a little dimension.


Supplies:
Cardstock:   Park Lane - White, Recollections - Oceans
Stamps: Stampin' Up - Heard from the Heart, Penny Black - Heavenly Love
Dies and Punches: Stampin' Up - Snowfall
Ink: Brilliance - Pearlescent Sky Blue
Embossing Folder: Park Lane - Snowflakes
Embellishments: Recollections - White and Silver Pearls, Blue Gems;
Simplicity (Save the Date) - Silver Twisted Twine

Monday, October 28, 2019

Another Ladies' Card Meeting in the Making

The ladies definitely enjoyed round one of card making.  We're getting ready to do a double event in a few weeks - 3 cards in the morning, carry-in luncheon and another 3 in the afternoon.  In the midst of preparing for 2 Christmas programs at school I managed to choose 6 designs that I wanted to use.  Today's card is my version of a card by Lorri Heiling.  I adore the technique of using double-sided paper to create the Christmas Tree.


I began with a base made from Shades of Red (Recollections) cardstock.  Next I took a sheet of Vanilla cardstock and embossed it with swirling vine folder.  I cut it down to make a mat for the tree and sentiment.  I used another piece of vanilla for the sentiment and stamped the Christmas sentiment with Color-it ink and matted it with olive cardstock.  I found a cute stitched ribbon on sale at Michael's for 70% and loved how it matched the lines in the design of the paper.  I used my Cricut to cut a 5" circle that was cut in half and scored at 1 1/4" to make the tree.  I followed the instructions at A Creative Operation and came up with this adorable tree.  Finally I added a star burst gem at the top and some textured brown paper as the stalk at the bottom.  Of course, I had to throw in a few pearls to give some extra bling.


   For the inside, I used the same ribbon and ink as before and stamped Santa flying through the air.
I can't wait to try this one with the ladies!  I wish our local craft stores had double-sided Christmas paper because I would love to try a few more styles with folded tree.

Supplies:
Cardstock:   Recollections - Shades of Red, Boutique Floral, Vanilla; Stash - Brown Textured
Design Paper: Stampin' Up
Stamps: Stampin' Up - All-Year Cheer I; Inkadinkado - Holiday Silhouettes
Dies and Punches: Cricut Machine
Embossing Folder: Park Lane - Vines
Ink: Color-it - Cherry Red
Embellishments: Recollections - Pearls; Want2Stamp - Bling Gems; Celebrate It - Red-stitched Ribbon

Sunday, September 22, 2019

Need Time to Slow Down a Little - Thankful for Card Night with the Ladies

What a crazy busy month it has been.  School is off to a good but active start.  We're already prepping for music programs and I feel like all I did was blink and we've come this far.  Time has been short for crafting so I was excited to have to set aside some time to coordinate a card night for the ladies from my church.  Such a wonderful opportunity to share my addiction...er, I mean the fun of card making!  😆

I came up with 4 card designs and then pulled one out because I thought it might have too many steps for someone who had never tried this before.  We created 3 cards and they told me next time they want more.  😊 My first card came from the desire to have a fall card and to put my leaves to good use.


I started with a sheet of dark orange as the front mat and attached it to a white card base.  Next I took a sheet of Crumb Cake from Stampin' Up and embossed it with the Tim Holtz's 3D Lumber embossing folder.  If you haven't checked out his 3D folders be sure you do.  They're awesome!

Next, I took a piece of olive green from Recollections' Boutique Floral and embossed it with Cuttlebug's Forest embossing folder and attached the piece on top of the Crumb Cake.  I used a piece of the orange from the Recollections' Brights pack to make the small dividing strip and base for my sentiment.  The sentiment is from Stampin' Up's All-Year Cheer I and is stamped in Mossy Meadow.  I used the same dark orange to create a mat to set it off from the leaves.

On the inside I used a few of the tree stamps from the Fiskers' Enchanted Forest set and pulled in my colors using Pumpkin Pie, More Mustard and Mossy Meadow inks from Stampin' Up.


For Card # 2 I used a layout from LeeAnn Greff and modified the colors and design slightly.  I chose Concord Crush and used the flower rather than the succulent from the Painted Seasons set from Stampin' Up.  I stamped the leaves in Wild Wasabi and the dots in Old Olive.  The small banners are cut from strips of the Concord Crush with Recollections' gems as bling.


I used some paper from my stash for the green strip down the side and embossed it with Anna Griffin's Brocade.  The sentiment is also stamped in Concord Crush and is from the Stampin' Up set Life is Grand.

On the inside I carried in the flower and leaves and then stamped the interior sentiment, also from Life is Grand in Memento Tuxedo Black.


The ladies did a great job with this one, but I realized I should have marked the stamp blocks with an up arrow to help them, because a few stamped the interior sentiment upside down.  Lesson learned!


The last card is probably my favorite.  I just love almost everything about it.  The design is CASE'd from Cheri's Cards.  Her design made me buy the supplies, because I just love it!  It starts with a white card base and a white mat.  The white mat is textured using a scissor and scraping down the edges.  She used some super cool new items from Stampin' Up's new catalog including the Harvest Hello set and the Apple Builder Punch.  She stamped the pumpkin onto a piece of the metallic acetate and then embossed with silver embossing powder.  Next she punched out the pumpkin and then punched out a pumpkin in Petal Pink as a backing.  Using the Petal Pink ribbon she created a pumpkin stem and attached it to the pumpkin and added one of the leaf trinkets (Stampin' Up) and the vine stamped in Petal Pink.  While she used "Blessed" I chose a stamp from Hero Arts for the outside.  The pumpkin is popped with a dimensional and sequins and pearls are added for some bling.


I stayed pretty true to Cheri's design because I loved it so much.  On the inside I used an American Art Stamp sentiment that I picked up on clearance from Hobby Lobby.  (Love my sales!!)


That's it!  Those are my three cards.  Thankfully, the ladies enjoyed it and want to do it again, so I'm busy choosing stamps and designs for Christmas cards, per their request.  Such a great time!  I loved watching these ladies and their excitement when they saw their finished products and what they were able to accomplish!


Supplies:
Cardstock:   Recollections - Brights, Boutique Floral; Stampin' Up -
Concord Crush, Crumb Cake; Park Lane - 110lb white
Stamps: Stampin' Up - Painted Seasons, Life is Grand, All-Year Cheer I; Hero Arts; American Art Stamp
Ink: Memento - Tuxedo Black; Stampin' Up - Concord Crush, Mossy Meadow, Pumpkin Pie,
More Mustard, Old Olive, Petal Pink; VersaMark - frost
Dies and Punches: Stampin' Up - Apple Builder Punch
Embellishments: Recollections - pearls, Silver Embossing Powder; Park Lane - gems; Stampin' Up - Adhesive Backed Sequins, Leaf Trinkets

Sunday, August 4, 2019

More Owl Punch Creations

Time for more fun with the Stampin' Up owl punch!  I love this punch and all of the neat ideas I've seen using it.  This time I took the opportunity to go old school and create a Pac-Man-esque card.  The ghosts are made using the owl body and removing the legs and turning it upside down.  I created Pac-Man with a circle punch and some scissors to cut the mouth.  I stamped the sentiment from the Banner Greetings set from Stampin' up and cut them with the Banners Framelits.


I also took the time to make a few more superheros and cards to go with them.  See my previous post for closeups of the superhero features themselves.  I started with Flash and Batman to wish you a "Super" Happy Birthday.  I used my 110lb white cardstock for the base, some red cardstock from my stash and some navy polka dot paper from my stash for a sky-like look.  The sentiment comes from the Stampin' Up set From the Herd and a small school stamp set from Michael's dollar bins.  


For the next set I decided to add some buildings to further create a night scene for Ironman, Thor and Spiderman.  Of course, Spiderman had to be hanging from the building.  😄  I used a circle punch to create the moons and a sentiment from the same Stampin' Up set to create Happy "Super" Birthday.  


Supplies:
Cardstock:   Stash - White, Blue, Yellow, Black, Green, Red, Purple
Design Paper: Stash - Navy with Navy Polka Dot and Navy with White Polka Dot
Stamps: Stampin' Up - From the Herd; Michale's - School Stamps
Ink: Memento - Tuxedo Black


Interested in purchasing this card to support Aine, a 14 y.o. battling Ewing's sarcoma?
Send me a message at HandmadebyHezy@gmail.com or visit my Etsy shop.

Saturday, July 27, 2019

Super Heros and Stampin' Up

What do these two glorious things have in common you ask?  Why the owl punch of course!!


Yesterday I spent the day with one of my best friends, who also has the scrapbooking bug.  I had brought with me WAY too much stuff as usual and was missing things I needed that I logically should have (why, oh, why did I forget my new blades for my trimmer?!?).  Alas, it was a great day for making doo-dads for my cards.  I started by pulling out my retired owl punch from Stampin' Up.  This beauty was an eBay find that I was stalking the site to find for a while.  A few month back I had run across a pin on Pinterest where someone had used it and immediately fell in love.  When I did a further search I found that so many people had come up with some great ways to use it, which only solidified my 'need' for this little wonder.  I was a little surprised at the actual finished size as they seemed larger in the pics online, but they are still amazing!


I needed to up my game when it comes to masculine cards so I decided to make some superhero owls that I can use on some boy cards.  OMGoodness do they tickle me!  I started first with a Spiderman owl.  I cut the owl body in both blue and red and then the eye pieces in black and white.  I cut off the feet of the blue owl and then cut the red to make the angled top and used the bottom pieces to make new red feet.  I used a fine tip pen to draw the spiderweb lines on the suit and then made a small spider symbol on his chest.  I was pretty excited with how he turned out.  👍


Next, I decided to try a more complicated one and made a Batman owl.  I cut out the body in grey and twice in black.  The belly was cut in black and the eyes in white and black.  I cut off the feet and top of the grey owl body to make the suit portion.  Next, I hand cut a piece of yellow to make the belt.  I placed the black belly piece on top and hand cut a yellow oval and drew a bat symbol for the buckle.  Using the second black body I cut it in half down the center then used some design scissors to make the wavy bottom.  One of the black eye circles was cut in half to make some eyelids to make him look intense.


Next up...the Flash!  I began with cutting both a yellow and red body (two), red, white and black eyes, a black and yellow heart and a white eye to be used as the suit symbol.  I cut off part of the ears and the feet of the red owl and then added a piece of the yellow behind it.  A strip can be cut from the center to make the yellow belt.  Using the second red body I once again cut it in half, only this time used it as wings/arms and added the yellow heart (cut in half) to make the arm bands.  I put together the eyes and cut the black heart in half to make the angled brows.  Finally I drew a lightening bold on the circle and colored it in with a yellow marker.  This one is probably my fav.  😁


Last up was Ironman.  Ironman began the same as the Flash with a red body.  From there I took pieces of the yellow to hand cut the face, arm and leg pieces.  The center piece is made using a white eye that has a blue triangle colored with a marker.  I once again cut black and white eyes and used one cut in half as eye lids.  Finally I cut pieces to make the arms of the owl.


I was super excited to show these to my husband when I got home...only one problem with using a couple of them together.  I am apparently 'mixing universes' and combined DC and Marvel characters.  Whoops!  😂  I'll figure that out later, for today I'm just ticked with my goofy owls!


Thursday, July 4, 2019

Happy 4th!

Before I go and celebrate the 4th with my family I wanted to share a card I made for a friend of mine.  She needed a wedding card so I went into my stash and made this lovely piece.  I love the gold and white together for the summer!


I chose the sketch 323 from Atlantic Hearts Sketch and started with a white card base and covered it with a shimmer gold that I had in my stash.


In keeping with the 'shades of yellow' color scheme at Cupcake Inspirations, I chose this gold stitched handmade paper my Mom and I found on sale.   I thought it fit perfectly for a card like this so I used it for the next layer and attached it with both glue dots and some liquid glue to make it extra secure.

For the sentiment I used a stamp I found at Hobby Lobby and stamped it in VersaMark Frost then embossed it with bright gold embossing powder from my stash.  I cut a piece of gold velum to create a little shimmer background to it.  My friend loves sunflowers so I also had to add that as my flower.


No Longer Two But One - Mark 10:8


For the inside I used the Painted Seasons set from Stampin' up.  I love this set and the matching paper and I'm so glad I was able to snag some.   I stamped  the flower in Daffodil Delight ink then I added a sentiment from Better Together in Memento Tuxedo Black.


I just love the simplicity of this card but it still has that shimmer from the gold tones.  

I hope you have a wonderful 4th!  I'm off to celebrate with my family!


This card has been inspired by and entered in to the following challenges.  Be sure to check them out!


Supplies:
Cardstock:   Stash - Gold
Vellum: Stash - Gold
Design Paper: MemoryStor Handmade Papers - Gold Stitched
Stamps: Stampin' Up - Better Together, Painted Seasons; Hero Art - Sentiment
Ink: Memento - Tuxedo Black, Stampin' Up - Daffodil Delight
Embellishments: La Petites - Sunflower


Interested in purchasing this card to support Aine, a 14 y.o. battling Ewing's sarcoma?
Send me a message at HandmadebyHezy@gmail.com or visit my Etsy shop.

Monday, July 1, 2019

So Thankful for Sunshine!


So thankful to have some sunshine and no rain for a few days!  While I'm not a huge fan of the temperature I'm not complaining since it's sunny!  Another bright moment - I was super excited to find I was recognized by Pammie's Inky Pinkies Challenges!  Be sure to check out their fun challenge blog.


Sunny days always make me think of flowers blooming and so I decided today's cards would have to have some bright colors and flowers!


I've been working my way through the Kathy Davis 6x6 paper pad "Happiness."  Such a wonderful set of colors! Check out my previous card here.  Don't you just love these designs?


My first card is based upon a sketch from Dawn's Stamping Thoughts.  I loved the angles on this sketch.  If you've never run across her sketches you should check her out.  I love the way she sets them up!

I started with my usual 110lb cardstock from Recollections and chose a piece from their Ocean pack and used some additional cardstock from their Cool Waters for matting as well.  For the sentiment, I broke out my Deco Labels framelits from Stampin' Up and my newer stamp and die set Well Said and Well Written, also from Stampin' Up.  These are examples of my final cards.  I was pretty pleased with the look!


My next card set from this paper pad uses a sketch from Mojo Monday.  


There aren't sizes listed for each piece so I pull out my old math skills to figure out the sizes and the adjust to my liking from there.  😆

I once again used my papers from Recollections and the Happiness paper pad.  I added a double Deco Label with a double cut sentiment from the Well Written dies.   I love joining in on a few challenges so my design elements fit within The Paper Players Tic-Tac-Toe Challenge:  PP448.  Be sure to check out their link below!  I embellished with some glitter tape and paper flowers from Recollections and some gems from Park Lane.


That finishes off today's cards!


Be sure to check out the following challenges!

6x6 Paper Pad - Happiness, "For You Friend"


For You Friend entered into:


Supplies:
Designer Cardstock:  Kathy Davis - Happiness Paper Pad Cardstock:   Recollections - Ocean, Clear Waters
Stamps: Stampin' Up - Well Said
Ink: Memento - Tuxedo Black
Dies: Stampin' Up - Well Written framelits
Embellishments: Recollections - glitter tape and paper flowers, Park Lane - gems


Interested in purchasing this card to support Aine, a 14 y.o. battling Ewing's sarcoma?
Send me a message at HandmadebyHezy@gmail.com or visit my Etsy shop.

Monday, June 24, 2019

More Chalk it Now


Time for another card from the Chalk it Now paper pad!


This card was inspired by the following sketch from Tuesday Morning Sketches:


I started with a black card base in my fav 110lb cardstock.  I cut a piece of the 6x6 design paper down to make the back piece then used a portion of the leftover piece to make the strip and flipped the paper over so the green design on the back would be showing.  For the sentiment I used Stampin' Up's Life is Grand to stamp "Make a wish."  I love the multi-tonal look of the stamp that gives it a chalky grey look.  I used a 2" punch to cut out the leaf design from one of the design papers then punched leaves from Stampin' Up's Foliage Framelits using the back design of the same paper.  I finished the front by adding a little Wink of Stella and a paper rose.


For the inside I put a piece of white cardstock and stamped an additional sentiment from the same set.
That finishes off another card from the Chalk it Now group.  The paper pad makes 3 of these!  You can check out my previous card design from this pad here.  

Be sure to check out the following challenges:

PIP challenge 1925

June #18
VW - Hippie
#168 - Cover the Card


Supplies:
Designer Paper:  K&Company - Chalk It Now Cardstock:  Recollections - Black
Stamps: Stampin' Up - Life is Grand
Ink: Memento - Tuxedo Black
Dies and Punches: Stampin' Up - Foliage Framelits, 2" circle punch
Embellishments: Wink of Stella, Recollections - paper flower


Interested in purchasing this card to support Aine, a 14 y.o. battling Ewing's sarcoma?
Send me a message at HandmadebyHezy@gmail.com or visit my Etsy shop.

Craft Show Fun

 Decided it was time to clear out some of my cards so I participated in a couple of craft shows with my dear friend,  Karen.  She makes awes...