Sunday, November 20, 2022

Craft Show Fun


 Decided it was time to clear out some of my cards so I participated in a couple of craft shows with my dear friend,  Karen.  She makes awesome quilts and also scrapbooks.  I even added in some alcohol ink creations for fun.

One of the items that sold out were the dog treat baggies.
Even the fur babies deserve a Christmas snack right?


Hope you are enjoying getting ready for the holidays!


Sunday, November 6, 2022

Beginning the Christmas Tag stash

 Today I have some cute Christmas tags for you that can be made with a circle punch.  These tags were so much fun, yet not overly complicated.  The ball part of the ornaments was made from a partial sheet of cardstock I had leftover.  Circles were punched and scored and I glued the sides to each other to give the 3D effect.  Everything was found in my stash which made it even more exciting to put together.  I can’t wait to try the technique with other types of punches!


Saturday, November 16, 2019

Another New Card-Making Adventure!


My school started a new section of classes for Junior High students called 'Electives' this year.  They happen once a week in an added 9th period on Fridays.  There are a variety of courses including everything from cooking to film history.  I get the opportunity to lead a card making class!  For our first card, I wanted to keep stamping to a bare minimum so I focused more on card layering.  I started with a piece of mint cardstock from Hobby Lobby as the card base.  Next I use different design papers to create layers on the card with a fall pumpkin theme.  I used another shade of cardstock for the mats for the design paper.


I tried to keep the sentiment easy for them by choosing a set of Thank You stickers and putting them on a circle punched from the same mint cardstock as the base.  For some extra design I found an awesome ribbon with butons sewn on that we adhered to the front with glue dots.


For the interior we stamped a sentiment on a piece of the dark green we used as mats on the front.  I chose to add a piece of cardstock to the interior instead of stamping directly on the card base in case they made a mistake and had to flip the paper over.  😁😁  The girls did a great job and I was so excited to finish one in the short time we had that first day.  

Supplies:
Cardstock:   Paper Studio - Mint, Dark Mint
Design Paper: Hobby Lobby - Pumpkins, Plaid, Orange Foil Pumpkins, Dark Mint Pattern
Stamps: Stampin' Up
Dies and Punches: Circle Punch 2 1/4"
Ink: Memento - Tuxedo Black
Embellishments: Button Ribbon, Paper Studio - Thank You Stickers


Tuesday, November 12, 2019

Warmest Wishes Card #6


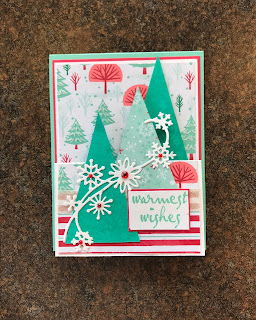
Today we finally have Card #6 for our ladies' event at church.  This one is probably my favorite.  This was the first time I had ever tried a double easel card.  I CASE'd the layout from Di Barnes.  I loved her design with the trees and and snowflakes.  I began with a Mint Macaroon card base for the largest easel.  Next I cut a piece to use as a mat from my Recollections Shades of Red pack.  To create the second easel I cut and scored a piece of white cardstock by Recollections (my usual 110 lb!).  Next I opened up the amazing new design paper from Stampin' Up - Let It Snow.  I cut mats to fit the front of both easels from the DSP then added some glitter washi tape by the seam.  For the Christmas trees I chose a tree image using Cricut Design Space and adjusted it to the height and width I wanted.  The trees were cut from Stampin' Up's Coastal Cabana.  Two of the trees were stamped with a tree image in VersaMark Frost to create some texture.  One was covered with another sheet of DSP from the let it Snow set.  Using Stampin' Up's snowflake dies I made the snowflake swirl and added some gems from Recollections to make them stand out a  little more.  Finally I used a stamp from the All Year Cheer I set from Stampin' Up as my sentiment.


Sorry for the next picture, for some reason the lighting is off, but it's actually the same card and paper as above.  The inside uses a snowman stamp from Holiday Silhouettes stamped in Coastal Cabana and another sentiment from the Stampin' Up set in Memento.


That finishes off my 6th and final card for our event.  Just love the multi-dimensional look when it's standing!


Supplies:
Cardstock:   Recollections - Shades of Red, White; Stampin' Up - Mint Macaroon, Coastal Cabana
Design Paper: Stampin' Up - Let It Snow
Stamps: Stampin' Up - All Year Cheer I, Inkadinkado - Holiday Silhouettes
Dies and Punches: Stampin' Up - Snowflakes
Ink: Stampin' Up - Coastal Cabana, Memento - Tuxedo Black, VersaMark - Frost
Embellishments: Glitter Washi, Recollections - Red Gems
Cricut Design Space

Saturday, November 9, 2019

Free as a Bird Christmas Card - #5

This card uses the amazing stamp set from Stampin' Up called Free as a Bird.  I love birds in general and this set is just amazing.  There are times that I don't know how they can eat so much bird feed in a short time, but I'm going to hope the quick turnaround is because we have so many birds, not just overeating birds.  😀

But back to the card!  I started with some wonderful metallic cardstock I got at a craft event in Ft. Wayne.  I made a mat for the front using Recollections Shades of Red cardstock behind a piece of design paper from Michaels.  Next I used a series of circle punches to create the front design using the Free as a Bird set and stamping it in Memento.  I used a piece of red ribbon between the circles and finished with a sentiment from Stampin' Up on white cardstock, matted again in Shades of Red.


For the interior I put a piece of the ribbon around a piece of white cardstock to create an interior mat.  The bird is fussy cut from the portion left over from the decorative stamp on the front.  Finally, I used my Stampin' Blends to color the birds to match the design paper.


Supplies:
Cardstock:   Recollections - Shades of Red, White; Rusted Curious Metallic Green
Stamps: Stampin' Up - Free as a Bird, Petite Pairs
Dies and Punches: Circle Punch 3", 2 3/4", 2 1/4"
Ink: Memento - Tuxedo Black; Stampin' Blends - Dark/Light Calypso Coral;
Dark/Light Poppy Parade, Dark Crumb Cake
Embellishments: Celebrate It - Red Ribbon

Wednesday, November 6, 2019

Holly Jolly Christmas - Ladies' Card #4


For today's card I finally got to use some of my wonderful handmade paper.  I just love the texture on it!  I started once again with cardstock from Recollections' Shades of Red pack for the card base.  For the front I cut a piece of Certainly Celery as a mat and pieces of the handmade paper and the design paper to make a front for the card.  I covered the seam of the two papers with a piece of Willow Green organza.  For the sentiment I used a stamp from the Christmas Traditions Punch Box, stamped in Certainly Celery.  The candy cane-like twine is from Ms. Sparkle and Co.  The whole sentiment is set off with pop dots to help draw your eyes in.


For the interior I broke out one of my favorite holiday stamp sets.  I stamped the elf, wagon and presents in Memento ink on a piece of white cardstock.  Next I took several of my Stampin' Write and Creative Memories markers to color in the adorable images from the Signs of Santa set.


Voila!  That finishes card #4!


Supplies:
Cardstock:   Park Lane - White, Recollections - Shades of Red, Stampin' Up - Certainly Celery
Design Paper: Handmade Red Texture Paper, k*i Christmas Tin Set
Stamps: Stampin' Up - Christmas Traditions Punch Box, Signs of Santa
Dies and Punches: Stampin' Up- Traditional Label Punch
Ink: Memento - Tuxedo Black; Stampin' Up - Certainly Celery; Stampin' Write - Only Orange, Crumb Cake
Green Galore, Yoyo Yellow, Gable Green, Pumpkin Pie, Tempting Turquoise, Orchid Opulence;
Creative Memories Markers - Brown, Blue
Embellishments: Ms. Sparkle & Co. - Red Twisted Twine, Stampin' Up - Willow Green Ribbon

Sunday, November 3, 2019

Merry Christmas Sizzix Die Card - Ladies' Night Card #3

What a crazy busy week!  It seems like things have been so full these last few weeks.  Thankfully, I've been able to enjoy a few card events in the midst of it all.  Today's card is another one I created for our ladies card day in November.  I began with a card die that I purchased at a craft show in Ft. Wayne.  They had some amazing products and since we don't have any scrapbooking or card shops in our area it was so nice to be able to see some new things.


I purchased this die with the card event in mind.  I started by using the Sizzix die to cut out the card base in white cardstock (110 lb, of course!)  With the type of die I was using, I might switch to a lighter weight cardstock when I make this with the ladies.  Next, I took a piece of red from the Recollections Shades of Red cardstock pack to create a mat for the interior that will show through around the front sentiment.  For the Outside sentiment and decorative interior mat I used some paper I purchased at Hobby Lobby.  After I attached them I cut a piece of white cardstock to make a mat for signing and decorated it with a Stapabilities row of stockings stamp in Memento - Tuxedo Black.  Finally, I used a piece of thin, Evergreen ribbon, wrapped it around and finished it with a bow.


Supplies:
Cardstock:   Park Lane - White, Recollections - Shades of Red
Design Paper: Hobby Lobby - Christmas Dotted Stripe, Christmas Polka Dots
Stamps: Stampabilities - Stocking Border
Dies and Punches: Sizzix - Merry Christmas Framelits Drop-ins
Ink: Memento - Tuxedo Black
Embellishments: Offray - Evergreen Ribbon


Craft Show Fun

 Decided it was time to clear out some of my cards so I participated in a couple of craft shows with my dear friend,  Karen.  She makes awes...